

Downtown Knoxville
Hello friends. Juicebeats here.
Saturday morning I was on a mission to take some artistic photography in downtown Knoxville. I met up with fellow photographer, Lev Gross-Comstock of Comstock Photography. We grabbed our Starbucks' coffee and headed to start shooting in Market Square. I've been downtown many times, but I've never really stopped long enough to see the area through an artistic perspective. We both had our 50mm lenses and started shooting in Market Square. My first few shots weren't of any buildings; I actually saw a bed of flowers that caught my eye. Since it is spring, I thought it was only fitting to take a couple snaps.
After getting a few different shots in Market Square, we headed down the street toward old Gay Street. We caught a couple of early risers walking down the street.
We also stopped to shoot a few cool things in the window of a production company.
Next, we headed over to the bridge overlooking the train tracks. I know that a lot of photographers have shot on this same bridge, but I wanted to try and get a new perspective and maybe achieve something new. I decided to capture a few high dynamic range images (HDR), which is taking a few of the same images with different exposures and putting them together to create a photo with a lot of detail. Here are a few examples.
They may almost look like paintings or drawn pictures, but they contain all the detail from the pictures I took. I set my camera up for the shot and took a normal exposure photo first; then, I took two more shots with the exposure compensation at -1 and +1, then to more at -2 and +2. This captured all the highlight and shadow detail that the original shot could not pick up. I edited the original photo in Lightroom as I would normally and synced all the same edits to the other four photos and exported to Photoshop. Finally, I combined all the images together in Photoshop and exported back into Lightroom where I finished the editing. Several steps were required to create these images, but I think they turned out pretty well.
After taking those shots on the bridge, we headed down to the tracks to take a couple shots.
I love how taking a shot on the railroad tracks with a wide angle lens makes them look like they go on forever. I had a lot of fun walking around and looking for things that I normally wouldn't pay attention to when I go downtown in the Old City.
Lev and I ended up walking around all over downtown from Market Square, to Gay Street, the Old City, and back up through the other part of Gay Street. We got some good exercise and took some great photos. It was a great learning experience for me and fun to capture some of the art of downtown Knoxville.
All of these photos in the blog and few others are available for purchase. Just click the slide show below. You can also download copies as screensavers or backgrounds.
Subscribe to the blog below to receive updates on everything that is happening with Juicebeats Productions.
Right now I am offering a $50 print credit with an individual or couple portrait session and $75 for a family session. Contact juicebeats1@gmail.com for more information.
Juicebeats

Newborn Photography Techniques
Hello friends and fellow photography enthusiasts,
My name is Jason (Juicebeats) Messing, I am a portrait photographer living in Knoxville Tennessee. Today I would like to talk to you all about my new venture into newborn photography.
Newborn photography is one of the hardest forms of photography to master because it can be incredibly tedious. You are working with newborn babies who don't often cooperate with you when you try to take their photograph. Newborn photography requires some patience and can take hours to finish. In doing my research to learn more about newborn photography, I found that most photographers that schedule newborn sessions will not schedule anything else for that day because of how long it can take. You have to worry about props, toys, blankets, hats, clothes, messes, etc., just to take a few shots. The photos are the easiest part of the session.
After researching some poses I liked on the internet, I put my creativity to work behind the camera. The first thing you have to worry about is lighting. In this case, I used the natural sunlight coming from the window in my son's room. Next, I set the white balance using a grey card. For this lighting situation, it can be a little tricky when you are not in a studio setting and do not have umbrellas, soft boxes, or even a high powered bounce flash. It was sunny outside, and the sun gave enough light in the room for me to work with. If you don't have a grey card, you can set your white balance to shade setting when using natural light from the window. It will give the room a warm tone, and it will be close to what a grey card will set your camera white balance to. The reason to set it to shade and not sunshine is because while the room received sunlight through the window, it still will not light the room like a truly bright sunny day. If you are shooting RAW rather than JPEG, the white balance doesn't make much of a difference because you can change it later on in your favorite editing software. The next thing I needed to set was my ISO and shutter speeds. I wanted the photos to look bright and clear so I set my ISO to 200 and set my shutter speed to as low as it would go without my highlights clipping in my histogram. This also gives me more detail to work with in post productions in Lightroom. I knew I was going to using a fast aperture at f2.8 on a 50mm lens, so I modeled the rest of my set up around that. My second camera was also set up the same way, but the lens is not as fast at f3.5. I set it at 35mm f4.5, ISO the same, and shutter speed even slower to compensate for the aperture speed difference.
Make sure your newborn is asleep or sleepy; if not they will squirm, cry, and be uncooperative. It was funny because the second time I tried to do the newborn shoot, my son was asleep when we started but woke up as soon as we got him into position. He did not want to take any pictures. I was lucky that I have a fast trigger finger and caught him just as he was about to throw a fit or as he closed his eyes for a second.
Basically what I can tell you to make sure you get the best out of the shoot is to make sure you do the newborn shoot in a 2 week window from the time they are born. This will be the best time for newborns because they stay asleep most of the day during this time. Also, make them as comfortable as possible--blankets, pillows, rubs, anything to keep them calm and sleepy. Newborns are also really flexible at this stage, so if you can get them to sleep, you will be able to put them in different positions. Just make sure you are there to catch them just in case they move.
Equipment I used for the shoot: The first shoot was shot with my NEX 5R and NEX 5N crop sensor system. I used a Nikon 50mm f1.8 E-series lens on the NEX 5N, which is a manual focus lens. On the NEX 5R I used the 18-55mm f3.5-5.6 kit lens. During the second shoot I used my Nikon D610 full frame sensor camera with the 50mm f1.8 G lens.
Here are some before and after shots of how I edited the photos using natural light.
Before
After
Before
Before
Before
After
After
After
I use Lightroom for 99% of my editing. All of these were edited in Lightroom except I exported the black and white one in Photoshop to do some of the darkening effects then imported back into Lightroom for the final edits. I used a combination of color correction techniques and some adjustment brushes to clean up the images. If you have any questions about any of the editing, feel free to comment below or contact me juicebeats1@gmail.com.
Juicebeats
Say What's On Your Mind
New Track for you produced by Juicebeats Productions...
Say What's On Your Mind - Jake Brown
Jake and I have been working together on music since he was 15 and I was 16 years old. He is one of the reasons why I started my own production company and have been working on music among other things for almost 14 years. My first album was a collaboration with Jake "Chapter 1" in which we released our first single "Whatz Up" on the radio in Knoxville, Tennessee. We recently collaborated on the track "Brother In The Brooks" which earn over 31,000 views before it was taken down by YouTube for becoming too popular too fast. It has been re-posted and you can find the links in my other blog posts. Listen and comment on the New single.
Upcoming events:
Holocaust Documentary: TBD
Inside the Mind of Juicebeats
I wanted to tell you a little about what I am thinking when mixing a song. The first thing I start with is listening to the whole track all the way through. The reason for this is that I will get a better feel for how I want to hear the track later on. This gives me a chance to hear what effects I want to use as well. I may listen to the track several times before I start editing and mixing.
The next step I take is to break the song into parts: chorus, verse, bridge. This way I can focus on each part individually. Usually, the chorus is the biggest part of a track, so I will spend a bit more time on it often using plugins to make it sound wider and bigger. I like using waves plugins, in particular waves doubler. It gives the voice a doubling and widening effect. I will throw this plugin on an aux track, send the chorus vocal to it, and use it to my liking. Without getting too technical, I use a basic plugin set up for all my vocals including Renaissance EQ, Waves DeEsser, CLA-76 Comp. This just gets the vocal to sound clean, crisp, and clear. The rest of the plugins I use are mainly to give color to the vocal.
Simultaneously while mixing vocals, you also want them to sit right in the mix. It can take a lot of practice to get this just right, but a good rule of thumb is to set the vocal in line or a db above the snare. It can depend on the song too and what you want to feature the most, the music or the vocals. For this particular song, "Dreamer," the vocals sit just above the snare.
QT likes to have some autotune on his vocals. I know that the chorus will definitely need some treatment. The key with autotune is to set the tune to the key of the song. In this case it is C major. He did 3 different vocals for the chorus, so I will need to blend them to sound as close to one vocal as I can. Mostly, you will try to do this in the actual recording part, but since I am only getting what was pre-recorded, I have to blend the best I can. I will set the level of the vocal that I want to be up front and then use the others to complement it. Using panning and my doubler effect, I am able to get the 3 vocals sounding nice and blended together. I have sent all 3 vocals to the doubler aux, reverb aux, and slight delay aux send. The delay and reverb are mainly there to help fill some space in the mix.
The next part I worked on was the verses. There wasn’t too much to work on since QT didn’t want any vocal effects, besides the normal treatment. I used EQ, Deessing, and Compression to clean up the vocals. Then used the doubler aux, reverb aux, and Waves H-delay aux. Doubler was used to beef up his vocals since they were only 1 take. The reverb and delay were used for filling up space in the mix. I used the same treatment on the non-singing part of the chorus and the at the end of the track. I also noticed that the second verse was a little louder than the first verse when it was recorded. Since I had both verses on the same track with the same treatment, I used Automation to lower the volume a bit on the second verse.
On the Master track, since I am not really mastering the track, I will still give it a mastering treatment, so the artist can hear what it would kind of sound like when it is mastered. I used the PuigTec EQ1-A, SSL COMP, and L2 limiter, basically, some mastering eq, not too much, but just enough to clean the track a bit. Some basic compression to even out the entire track, and the limiter so the audio will not clip or distort when it is played back in a car or stereo.
I know this is kind of broad, but I can’t give away all the secrets. It has taken years of learning to get the mixing part down, and I still feel that I need improvement. I’ll let you guys be the judge though.
Thanks for taking the time to read my blog. If you get a chance, check out my videos on YouTube: http://www.youtube.com/user/j32messing and subscribe to my channel.
#Juicebeats
Music Secrets

People have asked me the process for making a good music track. While there are many techniques in the music business, not one way is the correct way. Music can sound good to many different people, but it can also annoy or not sound so good to others. Certainly there is a fine line and it can go either way.
I know my music isn't for every one's taste or preference, but I also know that being in this business its all about finding your audience and targeting people who will follow. I try to put the best content I can together for people to listen.
Secret #1: Do not get discouraged because people do not like what you put out there. As I said before, people have different tastes. Find your audience and target the ones who will actually listen and like your content.
Secret #2: Keep going...do not stop, keep trying no matter what. You might just catch a break. That one time that you do stop could be the time you could have been noticed.
Secret #3: Develop your skills. Keep evolving. Music changes like babies change diapers, so you gotta keep up.
Secret #4: Get the right equipment/software. Pro Tools and Nuendo are studio standard, along with Logic, Cubase, Adobe Audition, etc. Need a Mic. A good condenser can give you great sound on certain instruments and vocals, and a good dynamic mic can produce amazing results. Get both!!! and do your research to find out which one will work best for what you are doing. Your going to need an interface or soundboard also. Usually if you have a studio at your house you will not need a soundboard unless you just want to be hands on and have the room for it. If you are on a budget, and need something smaller for your home studio, look for a brand known for making good mic pre's. I have a Motu Ultralite MKIII. but brands like RME, Universal Audio, Avid are all great too. You will probably need a Compressor and EQ also. Personally I think Universal Audio makes some of the very best, but for budgets I would pick up a presonus studio channel. You can pick one up for $299 and it will give you Tube sound with compression and EQ. You will also need plugins. Most of the top Digital Audio Workstations (DAWS) come with there own plugins, but if you can afford it pick up Waves and Universal Audio plugins you will not be disappointed.
Secret #5: Study. Learn the basics, but keep looking for information on new techniques and use them in your mixes. Trial and Error. You never know unless you try. I find many things online showing how people make music, so I try what they did. Sometimes it works out, and other times it doesn't sound very good. I have a very nice library of presets I use now after coming across them online doing research. Of course every mix is different so you still have to tweak, but having a good starting point is essential to taking your workload down a bit.
I know this is kind of broad, but this is how I learned. No one is going to reveal everything to you. You still have to work for it. If you still want to learn more though. Leave a comment that you would like to learn more.
#juicebeats
LIKE COMMENT SHARE #JUICEBEATS
Wedding Photography 2
The wedding day...I was pretty excited to be able to go to this wedding and see a beautiful couple get married. I also wanted to keep practicing my new found hobby and interest. I brought by 55-210mm lens with me this time to get those close intimate shots. I could really tell a difference in how much room I could see around my subjects. It was a lot closer and tighter shot, and I could really zoom in on faces and expressions. I wanted to be able to enjoy most of the evening and partake in the whole celebration, so I only took 175 shots which will probably come down to the best 50 or so maybe. I haven't finished editing all of the pictures yet so I will see what that number comes down to.
The day was pretty perfect for lighting and the weather couldn't have been better for a day in June. The venue: The Bleak House is an antebellum Classical Revival style house in Knoxville, Tennessee. It is on the National Register of Historic Places.
The house was first occupied by Robert Houston Armstrong and his wife, Louisa Franklin. It was built for the couple as a wedding gift by the bride's father, Major L.D. Franklin. Robert Armstrong's father, Drury Armstrong, gave them the land. The Armstrongs named the house after Charles Dickens' "Bleak House" novel of the same name. [1] The bricks in the house were molded on-site using slave labor.[2]
The home was used by Confederate Generals James Longstreet and Lafayette McLaws as their headquarters during the 1863 Battle of Knoxville. Three Confederate sharpshooters who were stationed in the house's tower were killed by Union cannonballs. Two of the cannonballs are still embedded in the walls, and Civil War-era sketches of the slain soldiers are displayed on the walls of the tower.[1][2]
The home now belongs to local Chapter 89 of the United Daughters of the Confederacy and is commonly called Confederate Memorial Hall. (wikipedia)
"These walls have history" as I would say. The venue was beautiful and the set up of the ceremony around a fountain made it all the more surreal.

This is a view of where the ceremony was held.
They had live strings to set the mood.

The ceremony was a traditional Christian wedding and the reception was lively and entertaining with a great local DJ.


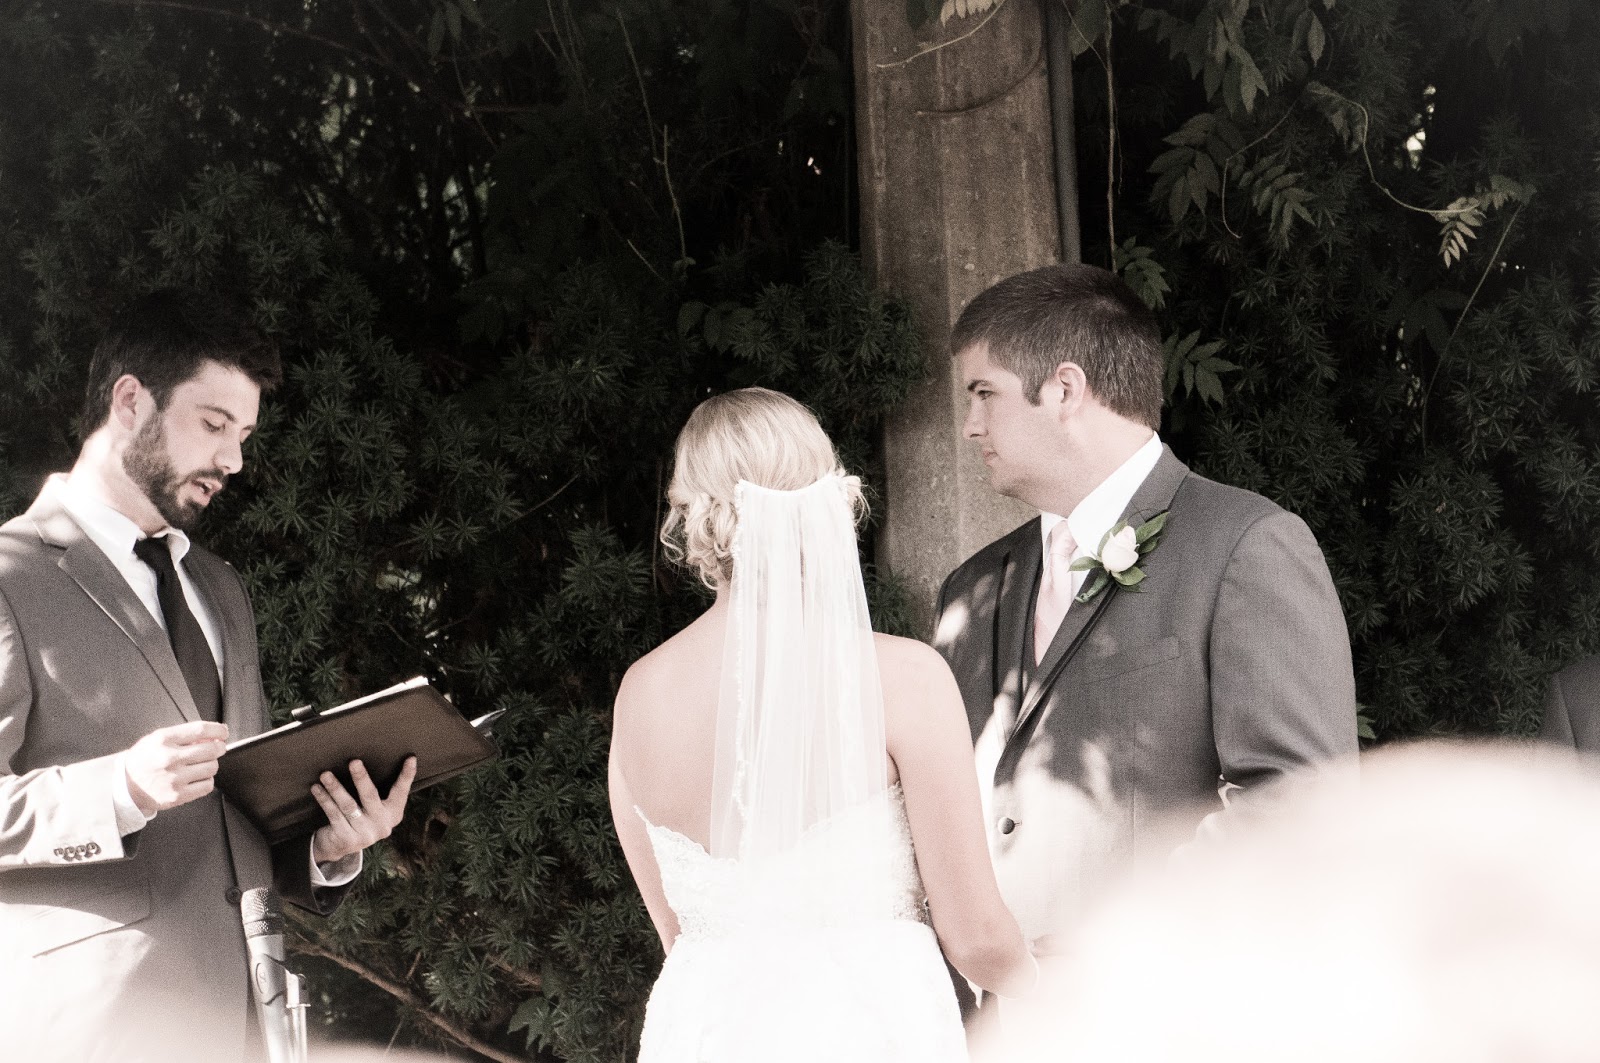
I feel like a captured some pretty good moments during the wedding. I was towards the back of the seats, but with my 55-210mm lens I was able to still get those close intimate shots. It was really good practice for me. My next attempt will probably be nighttime and low light photography. Its pretty tough without a good flash or a tripod/mono-pod. I noticed toward the end of the night that the shots I was taking didn't come out too well in the dark, so I definitely want to practice on that.
All in all it was a good experience, had a great time with some amazing friends, and got a chance to practice on my craft.
Juicebeats